Table of Contents [hide]
Let’s learn how to add custom CSS in WordPress for complete beginners. If you’re a beginner in the world of web design and you’ve just started building your WordPress site, you might be amazed at the wealth of customization options available.
WordPress is a powerful platform that allows you to create a unique and stunning website without extensive coding knowledge. However, there comes a time when you want to fine-tune your website’s appearance beyond what your theme and the core site editor can offer.
NOTE: This is a tutorial on how to add custom CSS in WordPress for beginners. If you are here because you want to know how to add a stylesheet in a .css file to your WordPress site, then read my post about creating child themes.
In my experience, there is often that one small, but very important thing that I just cannot change with the default editing options available. That’s when custom CSS comes to the rescue. In this guide, I’ll show you how to add custom CSS on your WordPress site, even if you’re a complete beginner.
What Is CSS?
Let’s briefly understand what CSS is. CSS stands for Cascading Style Sheets, and it is a styling language used to control the visual presentation of web pages. It’s responsible for the layout, colors, fonts, and overall look and feel of your website. When you add custom CSS, you’re essentially telling your website how it should appear to your visitors.
Why Would You Write Custom CSS?
Before we dive into the how-to, let’s explore why writing custom CSS can be beneficial:
- Fine-Tuning: Custom CSS allows you to make precise adjustments to your website’s design, going beyond the theme’s default options.
- Branding: You can align your site’s visual identity more closely with your brand’s unique style.
- Issue Resolution: When certain elements on your website don’t display correctly or overlap, custom CSS can help you fix these problems.
WordPress themes come with a themed set of styles already applied to your site, and you can use the WordPress block editor or your page builder of choice to customize the look of your posts and pages.
Despite this, there are plenty of reasons you would need to write some very specific CSS code to change certain things that are important to achieve the look of your site.
Now, let’s learn how to add custom CSS in WordPress.
Determine if You Have a Classic Theme or Block Theme
First, it’s important to determine the type of theme you’re using because the process of adding custom CSS may vary.
Classic Theme
The traditional, PHP-based themes that have been used for years and are primarily focused on controlling the appearance of a website.
Block Theme
A more modern type of WordPress theme that’s tightly integrated with the Gutenberg block editor, allowing for more flexible and content-focused website design.
How to Check What Type of Theme You Have
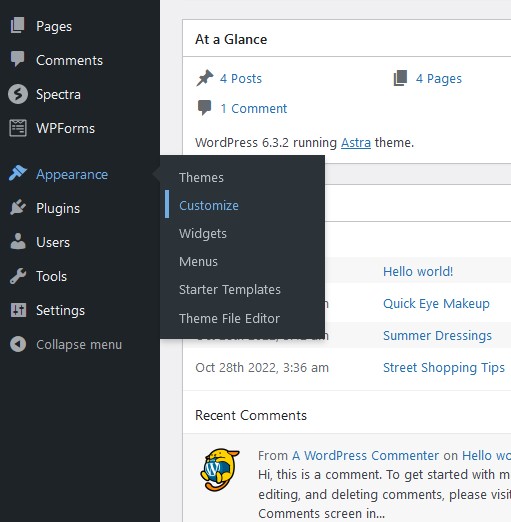
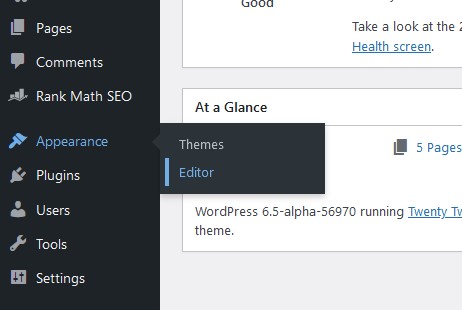
The easiest way to figure this out is to log in to your WordPress admin dashboard and check the available options under the “Appearance” tab.
If you see “Customize” as one of the options, then you are using a classic theme.
If you see “Editor” as one of the options, then you are using a block theme.
Armed with this knowledge, let us move on to the how-to section of this post.
Adding Additional CSS From the WordPress Dashboard
The method for doing this will vary based on what type of theme you have.
For Classic Themes
If your website is built on a classic theme, follow these steps to add custom CSS in WordPress:
- Log in to your WordPress admin dashboard.
- Go to Appearance → Customize.
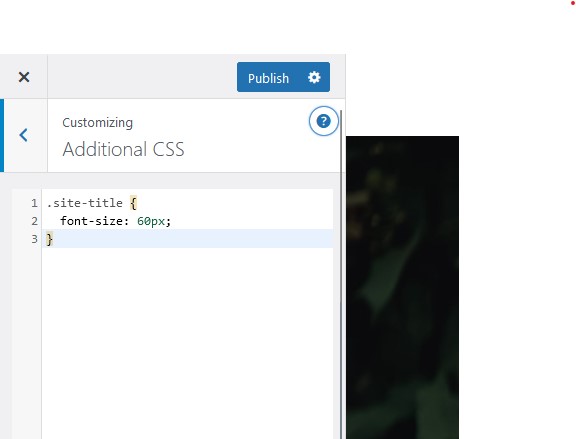
- In the Customizer, look for Additional CSS and click on it.
- A text editor will appear where you can enter your custom CSS code. Write your CSS rules here.
- As you add your custom CSS, a live preview on the right side of the Customizer will show you the real-time impact of your changes.
- When you’re satisfied with your custom CSS, click the Publish button to save your changes.
For Block Themes
If your website is built with a block theme, follow these steps to add custom CSS in WordPress:
- Log in to your WordPress admin dashboard.
- Go to Appearance → Editor.
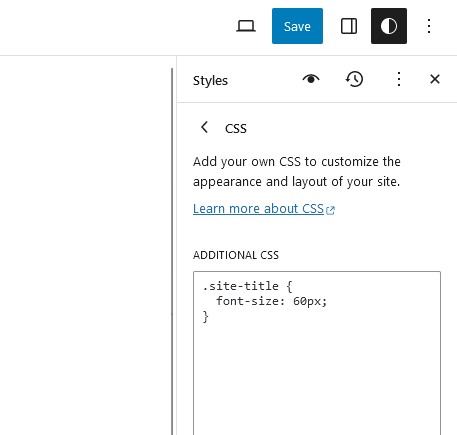
- In the Site Editor, click on Styles in the left sidebar, then click on the edit button that has a pencil icon in the same row as the heading for Styles.
- In the corner of the Styles right-hand sidebar, click the three dots and choose Additional CSS next to the close button.
- A text editor will appear where you can enter your custom CSS code. Write your CSS rules here.
- As you add your custom CSS, the live preview in the middle of your screen of the editor will show you the real-time impact of your changes.
- When you’re satisfied with your custom CSS, click the Save button to save your changes.
Adding Custom CSS Using a Plugin
If you prefer to manage your custom CSS with a plugin, there are several options available. Here is a list of plugins commonly used to add custom CSS in WordPress:
- WP Add Custom CSS: The simplest plugin solution for adding custom CSS to your WordPress website.
- Simple Custom CSS and JS: A straightforward plugin for adding custom CSS and JavaScript to your site.
- SiteOrigin CSS: A user-friendly plugin designed for customizing your site’s appearance.
- WP Add Custom CSS: This plugin allows you to add custom CSS to individual posts or pages.
- Jetpack: In addition to various other features, Jetpack includes a Custom CSS module. Only recommended if you are already using Jetpack for its other features as Jetpack is a very heavy plugin to install just for custom CSS.
CSS Learning Resources
As you embark on your WordPress journey, consider learning the basics of CSS. There are numerous online resources, tutorials, and courses available to help you get started. I also regularly publish my own personal tips and tricks for CSS. A solid understanding of CSS will empower you to make more precise customizations.
While I highly recommend any aspiring web designer to learn CSS properly, you can start making simple, but precise edits to your site’s appearance just by searching for how to do specific things with CSS.
Summary
Adding custom CSS to your WordPress website can help you achieve a unique and personalized design. Whether you choose to do it from the WordPress dashboard or use a plugin, the key is to experiment and learn as you go. Small changes can make a big difference in your website’s overall look, and with practice, you’ll gain confidence in creating the website of your dreams.



Leave a Reply